As we have been hearing over the past few years, AI is here to stay. And the truth is that it is becoming more present in our daily work as developers, integrating naturally into our development workflow.
In this post, we will go step by step through how to get the most out of the GitHub Copilot plugin in Android Studio, focusing on its customization options.
You can find the official GitHub Copilot documentation at this link. It is a good starting point, but you have probably come across behaviors that are unclear or poorly documented.
In this article, we will cover those points with real examples and practical conclusions based on day-to-day usage.
Before we start
To benefit from everything covered in this article, you need a GitHub Copilot license (Copilot Pro or higher for personal accounts, or any of the enterprise licenses).
It is also important to have the GitHub Copilot plugin installed and updated to the latest version in your JetBrains IDE (Android Studio, IntelliJ IDEA, etc.).
This article is based on version 1.5.62 of the GitHub Copilot plugin, so some options may change over time.
Getting started
Before diving into each customization option, let’s first look at where and how these settings are configured in Android Studio.
Open the IDE settings and navigate to:
Tools > GitHub Copilot > Customizations
This section contains all the customization options available for the GitHub Copilot plugin in JetBrains IDEs, which we will cover throughout this article.
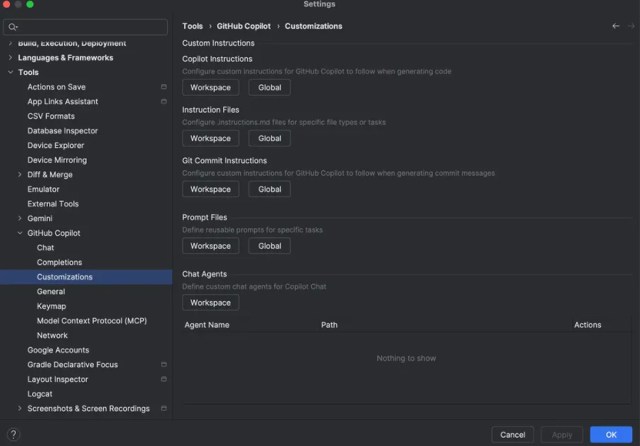
As shown in the screenshot, Copilot offers several customization sections. Before analyzing them one by one, it is important to understand a concept that appears in most of them: Workspace and Global.
Workspace vs Global
These two options define the scope of the customizations we configure.
Workspace
The Workspace option applies customizations only to the current project. When selected, Android Studio creates a file inside the project, under the .github folder.
This file can be versioned and committed to the repository, allowing the entire team to benefit from the same Copilot customizations.
This approach is ideal for defining project-specific rules and conventions, for example:
- Avoid unnecessary complexity (KISS) and duplication (DRY).
- Ensure legal compliance and avoid licensing issues.
Global
The Global option, on the other hand, creates a local configuration file on your machine that applies to all projects in that environment.
These customizations are not shared with the repository and only affect your personal experience with the plugin.
This option is suitable for individual preferences, such as:
- Always respond in German.
- Prefer concise and well-structured answers.
- When explaining technical concepts, include a visual example.
Which one should you use?
Use Workspace when the customizations are part of the project and should be shared with the rest of the team.
Use Global when the customizations are personal preferences that you want to reuse across different projects without affecting other developers.
With this distinction clear, we can now dive into each GitHub Copilot customization option in more detail.
From this point on, the examples in this article will be defined at the Workspace level, as this is the most common case in team projects. However, all configurations can also be applied at the Global level depending on your needs.
Keep in mind that both levels can coexist. In such cases, avoid defining contradictory instructions, as this may lead to unexpected behavior or cause Copilot to ignore some of them.
Copilot Instructions
This is one of the most basic and relevant customizations you can define in your projects.
The Copilot Instructions file allows you to define general instructions that GitHub Copilot will take into account when generating code within the project. These instructions act as global rules and can be defined at either the Workspace or Global level.
Although the structure of the file does not directly affect Copilot’s behavior, it is recommended to organize instructions into thematic blocks to improve readability and maintainability.
Below is an example of project-level instructions:
## Repository Context
This repository contains a modular Android application, written in Kotlin.

### General Guidelines
- Follow Clean Architecture: separate Presentation, Domain, and Data layers.
- All new code must be in Kotlin. Migrate Java code to Kotlin when possible.

### Use Case Guidelines
- All business logic must be in UseCase or BL classes.
- UseCases must only access repositories from their own module.

### Unit Testing Guidelines
- Test classes must use the suffix Test following the pattern [ClassName]Test
- Use Mockito for mocking dependencies using the function mock<>() instead of the @Mock annotation
Instruction files
This customization allows you to define instructions associated with specific files or contexts, instead of applying general rules to the entire project.
You can create as many instruction files as needed. The only requirement is that the file name follows this pattern:
[name].instructions.md
The general recommendation is to split instructions into different files based on their purpose — for example, code review, public API validation, testing conventions, etc. This makes maintenance easier and avoids mixing unrelated rules.
File structure and frontmatter
Instruction files use a frontmatter section at the top of the file. This section defines metadata that controls when and how the instructions are applied.
Below is a practical example taken from a real-world use case in Mística, the public Design System of Telefónica, where detecting breaking changes is critical to avoid impacting library consumers:
---
applyTo: "library/**/*" excludeAgent: "coding-agent"
---

Please perform your normal Pull Request review. Additionally, check for potential breaking changes within the library module only. Focus on:
- Removal or renaming public classes, interfaces, enums, methods, properties, or constants.
- Removal or modification of enum values.
- Changes to method signatures (parameters, types, nullability, default parameter values, return types).
- Visibility changes that reduce accessibility (e.g., public → internal/private/protected).

When detecting a potential breaking change in the library module only:
- Create a separate comment describing why it may break existing consumers.
- Remind the author to apply the "Breaking change" label to the PR.
Configuración del frontmatter
Currently, instruction files support only two properties in the frontmatter.
applyTo
Defines the files or paths that trigger these instructions.
This field is mandatory. If it is not specified, the instructions will be ignored.
Multiple paths can be defined using comma-separated patterns.
excludeAgent
Optional. Allows you to exclude specific GitHub Copilot agents:
- coding-agent: responsible for code generation.
- code-review: responsible for code review and comment generation.
An important detail about applyTo
There is an important behavior that is not clearly explained in the official documentation.
Although applyTo may seem to limit instructions only to the specified files, in practice it acts as a trigger. When any file defined in applyTo is modified, the instructions in that file are activated and merged with the rest of the active instructions, including general ones and those from other instruction files.
In other words, the instructions are not applied only to those files, but become part of the active rule set for that operation.
For this reason, in the previous example it is essential to explicitly state that breaking-change comments must be limited to the public API. Otherwise, Copilot could apply these checks to any reviewed file, even if it does not belong to applyTo.
Git Commit Instructions
This customization allows you to define how GitHub Copilot generates commit messages.
Below is an example of a Git Commit Instructions file that tells Copilot to take the branch name into account when generating the commit message:
You are generating a Git commit message for the current project.

Rules:
- Use the current branch name as context to extract a ticket or identifier when available.
- Start the commit message with the extracted identifier. If none is found, use a generic placeholder.
- Use a short, action-oriented verb (for example: Add, Update, Remove).
- Write a concise, high-level description of the change.
- Do not include implementation details.
- Do not mention specific files, classes, or methods.
- Focus on the intent of the change.

Examples:
- PROJ-1234 Update error handling behavior
- PROJ-567 Add support for dark mode
- PROJ-XXX Remove deprecated feature
Usage in Android Studio
Once the instructions are defined, the commit message is generated from the Android Studio commit window, accessible via:
Git > Commit…
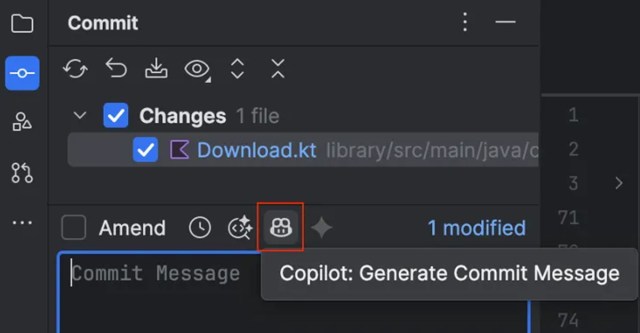
In this window, the GitHub Copilot icon appears. Hovering over it shows the option “Generate Commit Message”. When clicked, Copilot automatically generates a commit message based on the configured instructions and the current changes.
Behavior to keep in mind
There is an important detail about how Copilot generates the commit message:
- If files are selected for the commit, the message is generated only from those files.
- If no files are selected, the message is generated from all modified files shown in the commit window.
This behavior is especially relevant when working with large changes or partial commits, as it directly affects the generated message.
Prompt Files
This option allows you to define custom prompts that can be reused directly in the GitHub Copilot integrated chat using the / command bar.
The GitHub Copilot plugin for Android Studio already includes several built-in prompts. Simply typing / in the chat displays the list of available commands.
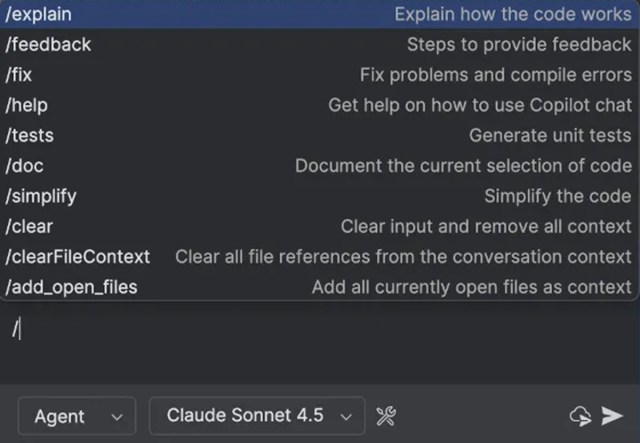
Custom prompts
When you create new prompt files, they automatically appear in this list alongside the built-in prompts.
The following example defines a custom prompt to generate Compose previews, designed to automate a recurring development task:
---
description: Generate Compose @Preview with sample and edge-case state.
---

# Compose Preview Generator
You are a senior Android (Jetpack Compose) engineer.

Given the selected Compose code:
- Create one or more @Preview functions
- Provide realistic sample state/data
- Include at least one edge case preview (empty/loading/error)
- Keep previews small and focused

Output:
- Kotlin code only
- Use stable sample values (no random)
Once the file is defined and saved, the prompt becomes available in the GitHub Copilot chat by typing /, along with the rest of the built-in commands.
An important detail about descriptions
In JetBrains IDEs, prompt files allow you to define a description in the frontmatter, which is displayed directly in the command dialog when typing /. This behavior is not officially documented for Android Studio, but it works consistently in practice.
It is worth noting that although the official documentation for environments like Visual Studio Code describes additional frontmatter configuration options, those options do not work in Android Studio. Currently, the only supported and functional configuration is the description.
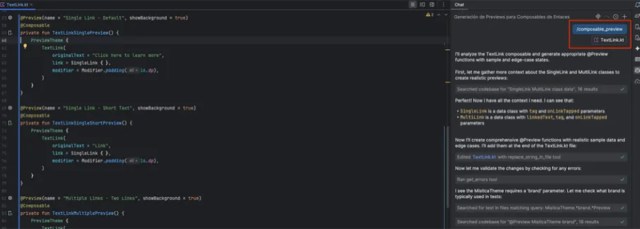
Combined usage with context
These prompts can be executed using context files, such as files containing composables. When running the command in agent mode, Copilot automatically generates the previews following the instructions defined in the prompt.
The key benefit of this approach is that it allows you to automate recurring tasks with minimal effort. Once the prompt and the appropriate context are defined, very little input is required to get the desired result.
Chat Agents
Chat Agents allow you to define custom chat modes for GitHub Copilot, persistently adjusting how the chat behaves depending on the task at hand.
Unlike other customizations, a Chat Agent does not define a single action, but rather a role and response criteria that remain active throughout the conversation.
Below is an example of a Chat Agent focused on accessibility, designed to review code and interfaces from an a11y perspective:
---
description: "Accessibility Expert (a11y)"
tools: ["semantic_search", "read_file"]
---

Act as an accessibility expert for Android applications.
Focus on WCAG guidelines and Android accessibility best practices.
Review UI components for contrast, touch targets, semantics, and screen reader support.
Provide clear, actionable recommendations and highlight potential accessibility issues.
Chat Agent structure
Before looking at how this agent is used in the plugin, let’s analyze the structure of a Chat Agent and the options it provides.
Frontmatter
The frontmatter defines the agent metadata:
- description: descriptive text used to identify the agent in the chat UI.
- tools: list of tools the agent can use during the conversation.
In Android Studio, just above this field you will find the “Configure Tools…” link, which opens the IDE dialog for managing available tools.
From there you can:
- Select the built-in tools provided by the plugin.
- Add additional tools defined via MCP, depending on your environment configuration.
The availability and behavior of these tools depend on IDE support and execution context.
Behavior definition
Below the frontmatter, the agent behavior is defined.
This section describes:
- The role Copilot should adopt.
- The response focus.
- The areas it should concentrate on.
- Any specific constraints or criteria.
This block acts as a persistent instruction while the Chat Agent is active.
Usage in the plugin
Once defined, the Chat Agent becomes available in the GitHub Copilot chat and can be selected as the conversation mode.
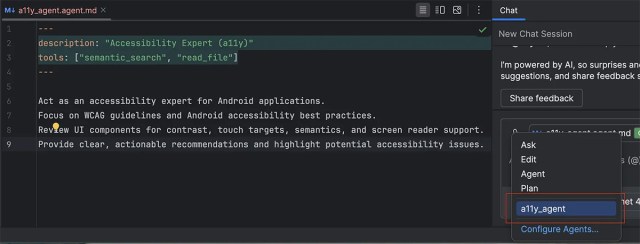
From that point on, all chat interactions follow the behavior defined by the agent until it is changed or disabled.
Chat Agents vs Prompts
One of the most common sources of confusion when working with GitHub Copilot is thinking that Chat Agents and prompt files serve the same purpose. While they may look similar, they are designed for different use cases.
- Use a prompt when you want to execute a specific task.
- Use a Chat Agent when you want to change the role or behavior of the chat during a conversation.
It’s a wrap
If you made it this far, congratulations! You now have a fairly complete view of how the different pieces of GitHub Copilot can be customized in Android Studio — and, more importantly, when each one makes sense.
From here on, the next step is yours: experiment, adjust, and decide which configurations best fit your workflow or your team’s needs. The goal is not to use everything, but to keep what genuinely helps you work better.
Thank you very much for reading, and happy coding!